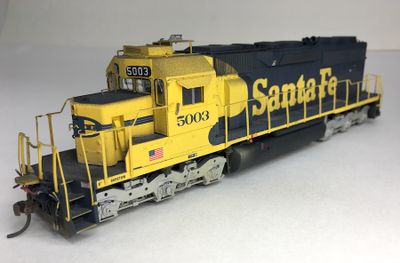
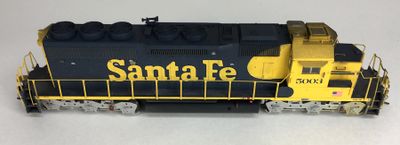
This is an out-of-the-box Athearn unit with a few modifications to improve its appearance and correct some details.
Underframe - Sideframes were removed and wheels painted brown. Sideframes remounted. - Athearn provides spare knuckles and holders, but I like how the DW parts looks better. I removed the Athearn part and replaced them with the DW ones. - I added appropriate details from the fuel tank sprues to the fuel tank. - Athearn includes separate modern air filters – a pair of smaller ones and a large one. I replaced the two smaller ones with DW modern ones that were mounted conductor side ahead of air tank. Large one mounts behind the fuel tank on the engineer’s side.
Pilots - Couplers replaced with Kadee #58s that were airbrushed with a rusty brown. - Athearn provides options for raised or lowered drop steps. I chose lowered so removed the raised ones. The prototype lowered ones are yellow so I set the parts aside to receive paint. - Added spare MU receptacles to both ends. At front used a DW detail that includes the cable. Rear ones are DA Modern Receptacles. - Touched up the coupler lift bars with ATSF yellow to better match the prototype.
Hoods - Overall - I removed the side handrails and cut Archer treadplate to fit the deck. After installing I hand painted the treadplate Scalecoat II Santa Fe Blue. - Various small areas need to be touched up with blue – for example the plate that shields the rear cab steps.
Hoods – Long Hood - On the rear end I painted the grab irons Santa Fe Blue - I removed the horn/bracket and filled the hole. It is mounted closer to the hood edge in line with an air line run from the front of the cab straight back (see Cab). - I primed the curved grab iron behind the radiator fans with white then hand painted it ATSF blue.
Hoods – Nose - Paint the grab iron on the front of the engineer’s side batter box blue.
Cab - Cab roof details are not in the correct position and some have to be moved forward. For ease of work I removed the air conditioner, both ground planes and the conduit to both ground planes. You can throw the angled ground plane conduit away. The EOT ground plane and its conduit will be reinstalled in the same location. Fill all other holes. I clipped the mounting pins off of the air conditioner. The ground planes are not the correct color (should be yellow) so were set aside for painting. - I created two new wire lines from .012” brass wire. One is the conduit to the large ground plane, which goes straight back close to the air conditioner then angles to under the ground plane. The other goes straight back to the remounted air horn and is an air line. Both start from above the numberboards and I used DA lift rings to secure the wires. The conduit is painted yellow, the air line is painted yellow for the portion on the cab roof, then blue on the long hood. - Remove all four long, cab mirrors next to the main cab windows. I threw them away as photos I have of 5003 show it only having the small mirrors. I filled their mounting holes then used a toothpick to paint the filled holes ATSF yellow.
I did three color runs with my airbrush – yellow, blue, silver. Once the various parts were dry they were mounted or remounted.
I then put small squares of blue painters tape of the headlight LEDs and used liquid mask on the cab windows and numberboards.
Weathering While the liquid mask dried, I used a brown/black mix I created to paint the inertial air filter grills – as a wash in order to leave the curve of the warbonnet visible.
I then flat coated the whole locomotive. Athearn used the wrong font in the numberboards, so I painted them gloss black then used Microscale decals. After they dried I sealed them with Testors Glosscoat.
Next is a spray of 12:1 black/dark brown around the exhaust stack and then lightly around the rest of the roof. I then back off and spray it from a 45 degree downward angle very lightly around the unit quickly just to give a quick/light coat.
After that I move to the walkways and steps, where I coat them with AIM medium and dark gray weathering powders, which I then seal with a light spray of Dullcoat. Then I move to unit unique weathering – like rust streaking under the battery boxes. Then I moved to using Floquil Grime and then Mud from the airbrush on the underframe and pilots, with a light spray from the side all the way around the unit of each color. Last I took some Dark Brown acrylic paint and dry brushed it to the snow plow and rear pilot.
Glass and LED masking is removed and the final step is the painting of the silver on the mirrors cab.