


|
|
|
|
|
|
| |
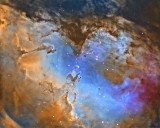
The Eagle Nebula in Serpens Cauda
The Eagle Nebula is part of a large emission nebula complex located 5700 light years away. The cluster associated with the nebula has approximately 8100 stars, which are mostly concentrated in the bright clearing in the northwest (upper right) area of the nebula. The dust columns at the center of the image gained fame as "The Pillars of Creation,” an iconic image that was captured by the Hubble Space Telescope in 1995 and recreated in 2015 to mark Hubble’s 25th anniversary. The column at upper left is 9.5 light-years or about 90 trillion kilometers long, about twice the distance from our Sun to the next nearest star. It was dubbed “The Fairy” by the editors of NASA’s Astronomy Photo of the Day, which published a high-resolution Hubble picture of the spire in 2005.
This is a tricolor narrowband image in a standard Hubble palette (SII:Ha:OIII mapped to R:G:B) with a turquoise-gold color shift. The nebula never gets more than 37 degrees above the horizon from my location, so I was surprised at the amount of detail captured in the image.
Exposure: Total exposure time about 22.7 hours. 19:25:24 x 20 minutes SII:Ha:OIII. All bin 1x1. Captured July and August 2020.
Light pollution: SQM ~18.38 (Bortle 7-8, NELM at zenith about 4.5, Red/white zone border.)
Image scale at capture: 0.6 arcsecs/pixel = f/5.7
Scale of presentation: 0.9 arcsecs/pixel (2/3 original scale)
Equipment:
Scope: C11 (standard, not Edge) with Celestron 0.63 reducer
Mount: Paramount MX+, connected via ASCOM Telescope Driver 6.1 for TheSkyX, with MKS 5000 driver 6.0.0.0
Camera: SXVR-H694, connected via SX ASCOM driver 6.2.1.17140 (SX 1.2.2 also installed)
Filter wheel: Atik EFW2 with 7x1.25 carousel and Artemis 2.4.3.0 driver
Filters: Astrodon Type IIi LRGB, 5nm Ha and SII, 3nm OIII
Rotator: Optec Pyxis 2", connected via Andy Galasso's 0.4 driver (Optec Pyxis Rotator AG)
Focuser: Rigel Systems GCUSB nStep motor with driver version 6.0.7 on stock Celestron focuser
OAG: Orion Thin OAG
Guide cam: Lodestar (first generation). 4 second exposures
Automation SW: Sequence Generator Pro 3.1.0.558
Guide SW: PHD 2.6.9, connected to guide cam via native SXV driver
ASCOM: ASCOM 6.3.0.2831
Platesolving: PlateSolve 2, failover to local Astrometry.net 0.19 server
Collimation: Metaguide 3, using ASI120MM connected via ZWO Direct Show driver 3.0.0.2
Processing Workflow by Workspace in PixInsight 1.8.8-7:
1. Calibration
Calibration with WeightedBatchPreProcessing with flats and bias, using Cosmetic Correction with a master dark
Blink to preview and reject a few frames
Rerun WBPP for weighting and registration
2. Stack and Mure Denoise
Image Integration on each channel
Mure Denoise on each channel
Dynamic Background Extraction – only the OIII layer needed this
Dynamic Crop
3. Linear Processing
No deconvolution. I decided I liked Multiscale Linear Transform better, which I did after a preliminary stretch. Deconvolution gave an overly sharp glow around the edges of some dark dust globules that I didn’t like.
4. Stretching
For each channel:
Apply STF to Histo Trans
Stretch and Create Starless Image:
Multiscale Linear Transform (using Bias) for sharpening
Curves Transform
TGV Denoise
Star Removal with StarNet, using a mask to protect high contrast areas *
Results = “SII Starless”, “Ha Starless” and “OIII Starless”
Subtract original image from starless image, leaving just the stars
Results = “SII Stars”, “Ha Stars” and “OIII Stars”
* StarNet often damages detail in these areas, so to protect it I create a mask in Photoshop: after the initial run of StarNet, I port both the original and the starless image into Photoshop, layer them, and create a mask for any damaged areas. Then I port the mask back into Pixinsight, and run StarNet again on the original image. This time the detail is protected by the mask.
5. Stars Processing
Histo Trans on Stars images until star sizes are roughly equal between channels
RGB Combination, mapping SII:Ha:OIII to R:G:B
SCNR on green
Invert, SCNR on green, re-invert (this fixes magenta star halos)
Result = “Stars”
6. Nebula Processing
Combine starless images with PixelMath, mapping SII:Ha:OIII to R:G:B
GAME script to create an elliptical gradient mask to protect the core
Curves Trans, brightening up the outer regions
64 pixel Localized Histogram Equalization on outer regions to enhance local contrast
Invert mask, apply 32 pixel, less aggressive LHE on inner regions, protecting brightest parts of Pillars
Color Mask script: create green mask
Curves to shift green to gold
Color Mask script: create blue mask
Curves to enhance blue
SCNR green average neutral to shift remaining green patches to gold
Mild 32 pixel LHE on Fairy and base of Pillars
Result = ”Nebula”
7. Photoshop
Layer Stars as a linear dodge layer (equivalent of PixelMath add function) on top of Nebula
Blur Stars slightly around brighter stars (some stars were just a little too sharp for my liking)
Use Spot Healing Brush on Nebula as necessary to remove remaining star halos
Noise reduction in lower corners (using a mask) to eliminate some excess noise
8. Final
Mild TGV Denoise
ICC Profile Transform to sRGB
Resample to 2/3 original scale
Save as JPG
| comment | |