To add copyright text to every (same-sized) image, we first create masks that are used
to lighten and darken the image in such a way as to produce a text overlay with a drop shadow.
Modifying the process if you do not want a drop shadow should be an obvious simplification.
Then in the workflow, we use the Transformation->Gray->Levels and Color to apply the copyright text.
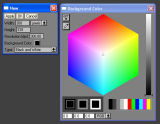
The first step is to create a blank, black image that is the same size as all the images
to be copyrighted. You can launch the dialog with the correct pixel dimensions if you select
a representative image first, then click on the menu File -> New. Change the default
background color to black, and make the image type black&white (so it works as a mask).