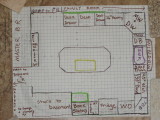
Using my diagram, let's go on a tour! Bear with me, though, because the base cabinets on the sink wall ended up in a different order than in this diagram. I will tell you what order they are in, and you can see where we were "going to" place them in this diagram.
You can see where the sink is, below the window. When standing at the sink, the 18" trash base is at your left, next to the corner cab that will hold the dishwasher and microwave. To your right is a 19" 4 drawer base, then a 33" wide base with a drawer and pull out trays. At the end of the base cabinet run will be the 6" wide tray cabinet. Above the cabs to to the right of the sink is the only wall cab that fits in the kitchen work area. The TBD at the end of this cabinet run ended up as a corner cabinet, made by Jim, our contractor/carpenter. He made it so that it connects up to the big wall cab and the wall oven cab, so that it is a seamless transition. We learned that we can still get matching doors and drawer fronts for these cabinets, so that made it possible to add some. Then Jim got all creative on me and ended up duplicating the door and door fronts himself in his shop. He thought it was too expensive to order the doors, so he made them himself.
There is a 30" white wall oven at a 90 degree angle from the cab run we just explored. Jim used the doors of an existing cab for the cabinet above the WO, and make three deep drawers for under the WO. Then is the fridge in a built-in cab with storage above, an 18" shelved pantry cab, and book shelves behind glass doors (the whole cabinet and door made by Jim). The green box in front of the bookshelf is going to be a little bench. We have the ceiling of the stairwell coming up above the kitchen floor there. That area used to be a really unusable pantry closet. It was 30" wide and 40" deep. Talk about things getting lost in the back of the cupboard! Since the "slant" must stay, we will top it with a little bench one can sit at after you take a book from the bookshelf. Jim will make it.
Next, we have the island. It is six cabs all built together. The outer two cabs are under the angled ends, and open on an angle, too. They have three or four shelves. The next cabs in from the ends have drawers on top, then two narrow pull-out shelves.that can hold saucepans The middle two cabs are under the cooktop, so have shallow tray-like drawers on top. Below these drawers are two shelves for pan storage. Because there is room for a downdraft vent in these 2 bases, these are not very deep shelves because the downdraft is behind them. There are no base cabs on the sitting side of the island. So the 24" deep cabinets are backed by a nice 16" deep knee space.
On the left side of the diagram you see the hall that leads to the half bath if you turn left, then the laundry room if you walk past the half bath. The entry to the garage is in the laundry room. The kitchen is behind the garage. If you exit the kitchen and just walk straight down the hall, you end up in the main hall. Turn left in the main hall and you are in the foyer outside the Living Room (which is a music room/library for us.) Turn right when you get to the main hall and you are outside the three bedrooms and the full bath.
On the kitchen wall past the hallway, I have placed two 30" wall cabs side-by-side on the floor. Jim will make a toe-kick platform for them to sit on. There will be a 14" deep counter on top. I have wall cabs for above this little counter, but DH and Jim both said to try the wall without them. They thought the kitchen was getting too "closed in" if we used wall cabs here.
Past these shallow cabs is the family room. I have a ramp going down the 6" step there now. Jim will make me a longer and wider ramp and it will be covered with the new linoleum flooring. The family room space is pretty much the same size as the kitchen (if you don't have the extra space above the basement stairs where the fridge and WO live). Jim built a new wall between the kitchen and the family room to back up the cabinets and provide a wall into which electrical service can be strung. The wall is only floor-to-ceiling for the first six feet behind the corner DW cab and the big pantry. After the pantry is a 30" high desk area. First, an 18" wide 3-drawer base, a 30" single drawer above the seating area, and a 28" drawer and door base (think printer compartment.)
The wall behind the desk ended up 40" high and is topped with oak. Luckily, the tallest of our dogs, who used to climb the FR furniture to get on top of the kitchen counters and cruise for food, cannot easily negotiate the 40" wall. He has tried, but we catch him at it because the wall slows him down! He is gated out of the kitchen/family room area unless one of us is in it with him, the thief!
The wall separating the kitchen and the family room may seem counter-intuitive. The current fashion is to tear such walls down. Because of the number of floor-to-ceiling cabs that were in this used kitchen I bought, some of them had to go along this side of the kitchen. We miss not being able to see each other when in the separate rooms, but we can still talk as easily. The person in the kitchen can still see the TV (DH likes to watch a ball game, old movie, or such when working in the kitchen). The wall seems to have made our family room larger. Before, we could not place the couch with its back facing the kitchen because it was too easy a route for a certain spotted hound to get onto the countertops. With the wall, we can place furniture along that whole length, giving us a larger space in the center of the family room. I really appreciate not seeing kitchen clutter, too. You can relax more in the FR and it feels less cluttered now.