


|
|
|
|
|
|
| |
| 16-DEC-2011 | |
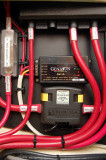
A solar panel sized to actually "re-charge" a bank, not just maintain it, should ideally be routed directly to the house bank. The white jacketed wire coming into this Genasun controller is the panel feed. The connections are easy and clearly labeled on most controllers. Hooking them up is the easy part.
The black & red wires leaving the controller go to the house bank. The red wire is "switched" so the panel can be turned off if needed. Check with your controller manufacturer to see where an ON/OFF switch can be installed if you want the ability to flip the panel OFF. ON/OFF switches are normally installed on the battery/output side of a controller but this can vary from manufacturer to manufacturer.
There is also a fuse in the red wire between the battery bank and switch, that can't be seen. It is installed close to the battery + post. When connecting anything directly to a battery bank the wire should be fused. The ABYC suggestion is for the fuse to be within 7" of the + post of the house bank. While not always possible to be within 7" try to get it as close as possible.
If you have a secondary starting or reserve bank you can then use a device like an Echo Charger or an VSR type relay to charge the start or reserve bank and keep it topped up. Even without a solar panel an Echo Charger or VSR are useful devices.
Some charge controllers, such as the Morningstar SunSaver Duo PWM, can charge two banks simultaneously. This is a nice feature if you don't have an Echo Charger or VSR to charge two banks from one array.
© All Images property of Compass Marine Inc.