


|
|
|
|
|
|
| |
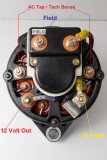
Here is the finished product. One last detail you will need to do is to create a jumper wire from one terminal of the plate to the ground stud on the alternator. This is the black wire in teh photo with the yellow crimp connectors.
Unfortunately my good heat shrink connectors & crimpers were on the boat when I took these photos so I made up a cheap jumper wire for illustrative purposes only.
Leece-Neville recommends a 12ga wire for this jumper. I recommend heat shrink crimp connectors & tinned 12ga wire. If you do not ground one of the cover plate studs to the alternators ground terminal the alternator will not work. The alternators ground terminal must also be grounded to the boats ground.
I also permanently labeled the field stud with my label maker so it is easy to wire and remember which is which. The 12V output stud gets wired directly to the positive side of your boats electrical system . I recommend wiring this directly to a battery, such as the house bank, so you can't fry the alternator diodes by turning off the battery switch when the motor is running.
For your diesel engines tachometer sense simple wire to either of the studs marked AC Tap. You may need to recalibrate your tachometer after the installation of a new alternator. This is a 12 pole alternator.
© All Images property of Compass Marine Inc.