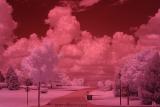
This is the "Starting" image for the next series of Steps. Please feel free to use this image to follow along in Photoshop if you wish...
Exposure Suggestions
A few things to note:
ñ Some lenses will work much better than others, I have had great luck with my Canon 50mm f/1.8. Some lenses may flare unacceptably, a hood may help.
ñ Different Cameras will require different exposure times. My Canon 300D takes several/many seconds to get a good exposure, it depends on your cameraís IR cut filter (normally a good thing).
ñ A tripod will be required. Use a shutter release cable or use the self-timer.
ñ Shoot RAW if possible since you will have more latitude to adjust exposure if necessary. You will also be able to adjust White Balance if necessary.
ñ I usually take multiple shots of the same scene and bracket almost everything since you donít how it will look until you start working in Photoshop. I bracket everything when shooting: Shutter Speed (usually somewhere between 2 and 10 seconds), Aperture (f5.6 and f/8 seem to work well), and ISO setting (usually 200 or 400).
ñ Sun angle / sun position, time of day, etc. all become important variables. I need to experiment more with these, but peak of summer works well around Noon (i.e., strong sun).
ñ Interesting pictures have trees, clouds, water, and sky or something similar for contrast.
ñ The Hoya R72 IR Filter is nearly OPAQUE so setup your first shot composition WITHOUT the filter on. Once you got the scene setup switch to manual focus and put on the IR filter and start shooting. With the IR filter on, you won't see anything through the lens, but you will see something on the LCD after the picture has been taken.
ñ Shoot in MANUAL mode. You need complete control over your camera.
ñ I don't try to meter with the camera. I just use the histogram to judge exposure. (More below)
Initial Exposure: I usually start with something like 6 secs, f/8.0, ISO 400. Check through the EXIF data in my IR gallery for some further examples. Again, take lots of shots and bracket. Over time you will be able to better understand what a good histogram looks like for your camera when shooting IR. It wonít be the same as a traditional good exposure histogram. (Maybe only 1/2 to 2/3 to the right?). In general lower ISO settings will help reduce camera noise, but will increase your exposure time, so it is a tradeoff, but Photoshop can help with some advanced noise reduction. I don't try to meter using the camera, I just use the histogram as my exposure guide.
The actual exposure of this image was 1sec at f/4.0 ISO200. Not sure how I got so lucky, but the sun angle and strength must have been just right. Usually my exposure times are much longer (i.e., 4-8 secs).