


|
|
|
|
|
|
| |
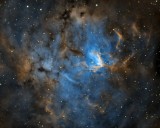
The Fossil Footprint Nebula in Perseus
NGC 1491, also cataloged as Sharpless 2-206 and Cederblad 25, is a fairly dim emission nebula located about 10,000 light years away in the Perseus arm of our galaxy. At the core of the nebula is the O4 main sequence star BD+50 866, which is lighting up and eroding the surrounding dark gas and dust. O-type main sequence stars have up to 90 times the mass of the sun and are up to a million times more luminous. Stellar wind from the star appears to have formed a shock front, which makes this object look a bit like an early version of a Wolf-Rayet bubble like the Bubble Nebula, but I haven’t seen any suggestion that BD+50 866 is a Wolf-Rayet star. (A closeup image of the core, at 0.6 arcseconds/pixel, shows the shock front in more detail.)
The nickname “Fossil Footprint” seems to have first appeared around 2016, but I haven’t found the source.
This is a tricolor narrowband image in a standard Hubble palette (SII:Ha:OIII mapped to R:G:B) with a turquoise-gold color shift.
Exposure: Total exposure time 28 hours. 25:27:32 x 20 minutes SII:Ha:OIII. All bin 1x1. Captured September to November 2020.
Light pollution: SQM ~18.38 (Bortle 7-8, NELM at zenith about 4.5, Red/white zone border.)
Image scale at capture: 0.6 arcsecs/pixel = f/5.7
Scale of presentation: 1.2 arcsecs/pixel (50% of original scale)
Equipment:
Scope: C11 (standard, not Edge) with Celestron 0.63 reducer
Mount: Paramount MX+, connected via ASCOM Telescope Driver 6.1 for TheSkyX, with MKS 5000 driver 6.0.0.0
Camera: SXVR-H694, connected via SX ASCOM driver 6.2.1.17140 (SX 1.2.2 also installed)
Filter wheel: Atik EFW2 with 7x1.25 carousel and Artemis 2.4.3.0 driver
Filters: Astrodon Type IIi LRGB, 5nm Ha and SII, 3nm OIII
Rotator: Optec Pyxis 2", connected via Andy Galasso's 0.4 driver (Optec Pyxis Rotator AG)
Focuser: Rigel Systems GCUSB nStep motor with driver version 6.0.7 on stock Celestron focuser
OAG: Orion Thin OAG
Guide cam: Lodestar (first generation). 4 second exposures
Automation SW: Sequence Generator Pro 3.1.0.558
Guide SW: PHD 2.6.9, connected to guide cam via native SXV driver
ASCOM: ASCOM 6.3.0.2831
Platesolving: PlateSolve 2, failover to local Astrometry.net 0.19 server
Collimation: Metaguide 3, using ASI120MM connected via ZWO Direct Show driver 3.0.0.2
Processing Workflow by Workspace in PixInsight 1.8.8-7:
1. Calibration
Calibration with WeightedBatchPreProcessing with flats and bias, using Cosmetic Correction with a master dark
Blink to preview and reject a few frames
Rerun WBPP for weighting and registration
2. Stack and Mure Denoise
Image Integration on each channel
Mure Denoise on each channel
Dynamic Crop
3. Linear Processing
Dynamic Background Extraction
Deconvolution on each channel, using masks made in Photoshop so that only the brightest areas were sharpened.
4. Stretching
For each channel:
Histo Trans x 2
On Ha and OIII, stretch up outer nebulosity with Curves, using a range mask to protect the core. I found the SII didn’t benefit from this stretch.
TGV Denoise to reduce fine-grained noise
Multiscale Median Transform to reduce large-scale noise and lumpiness in outer regions, using a range mask to protect the central area
5. Create Nebula Image
ChannelCombination, mapping SII:Ha:OIII to R:G:B
Star Removal with StarNet, using a mask to protect high-contrast areas*
Result = ”Nebula”
128 pixel Localized Histogram Equalization
Turquoise-gold color shift: SCNR green average neutral, Curves to enhance color saturation (I tried doing the turquoise-gold color shift with the ColorMask script, but in this case I found SCNR + saturation gave a better result)
Additional TGV Denoise
Additional MMT denoise, protecting the core with a range mask
*StarNet often damages detail in these areas, so to protect it I create a mask in Photoshop: after the initial run of StarNet, I port both the original and the starless image into Photoshop, layer them, and create a mask for any damaged areas. Then I port the mask back into Pixinsight, and run StarNet again on the original image. This time the detail is protected by the mask.
6. Create Stars Image
ChannelCombination with linear images, mapping SII:Ha:OIII to R:G:B
PhotometricColorCalibration using narrowband filter settings
Extract color channels
HistoTrans on each channel, keeping star sizes roughly equivalent between the channels
Recombine with ChannelCombination
Run StarNet with the same mask used to create the Nebula image in step 5 above
Subtract the resulting starless image from the image with stars. The result is an image with stars, no nebulosity, and a background of zero = ”Stars”
Fix magenta halos: invert the image, run SCNR on green, and reinvert
TGV Denoise
7. Photoshop
Layer Stars as a linear dodge layer (equivalent of PixelMath add function) on top of Nebula
Use Spot Healing Brush on Nebula as necessary to remove remaining star halos
Curves and levels to increase contrast a bit
8. Final
Mild TGV Denoise
ICC Profile Transform to sRGB
Resample to 1/2 original scale
Save as JPG
| comment | |
| Sakib | 05-Apr-2021 20:22 | |